
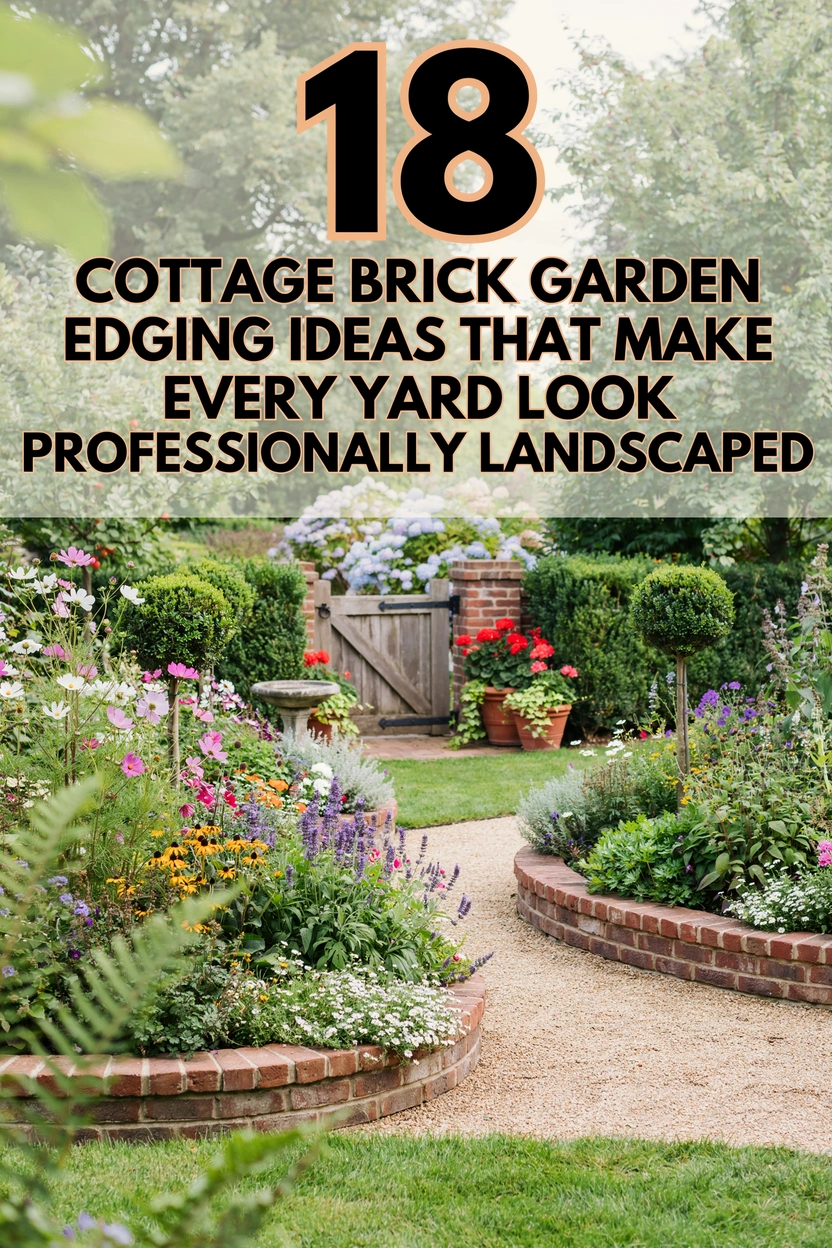
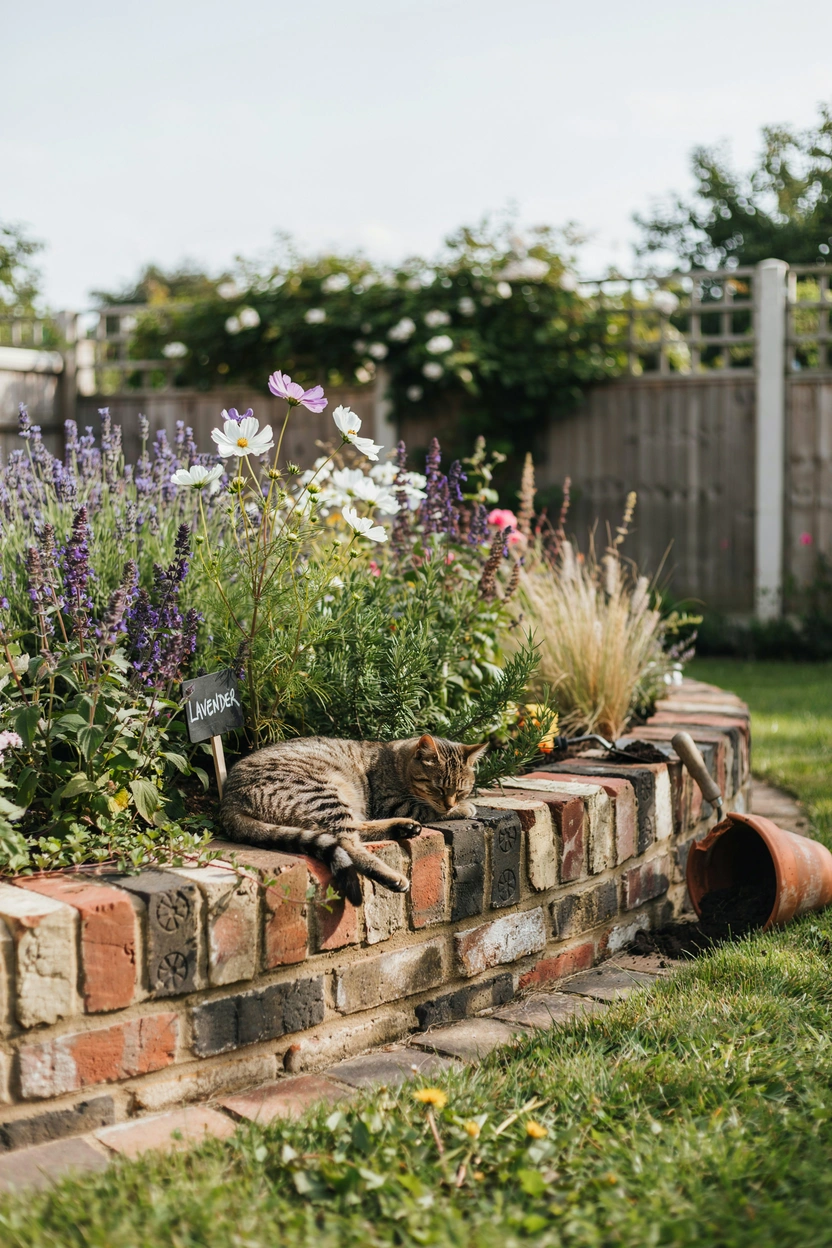
You can spend an entire weekend planting, mulching, and pruning — and your garden can still look a little… unfinished. I’ve been there. Everything is growing well; the flowers are blooming, but something feels off. Then I added brick edging around one bed. One afternoon of work. And suddenly, the whole yard looked like someone who actually knew what they were doing had designed it.
That’s the quiet magic of garden edging. It doesn’t grow. It doesn’t bloom. But it frames everything else so beautifully that the entire garden looks intentional, clean, and cared for.
Brick is honestly my favorite material for this. It’s cheap, it’s tough, it works in every garden style — from a rambling cottage garden to a sleek modern backyard — and most of these ideas don’t require mortar, special tools, or any real masonry experience: just a spade, some sand, and an afternoon.
I’ve put together 18 specific brick garden edging ideas that cover everything: classic patterns, creative layouts, front yard borders, flower bed edging, budget options, and a few ideas I genuinely hadn’t seen done before. Let’s explore.
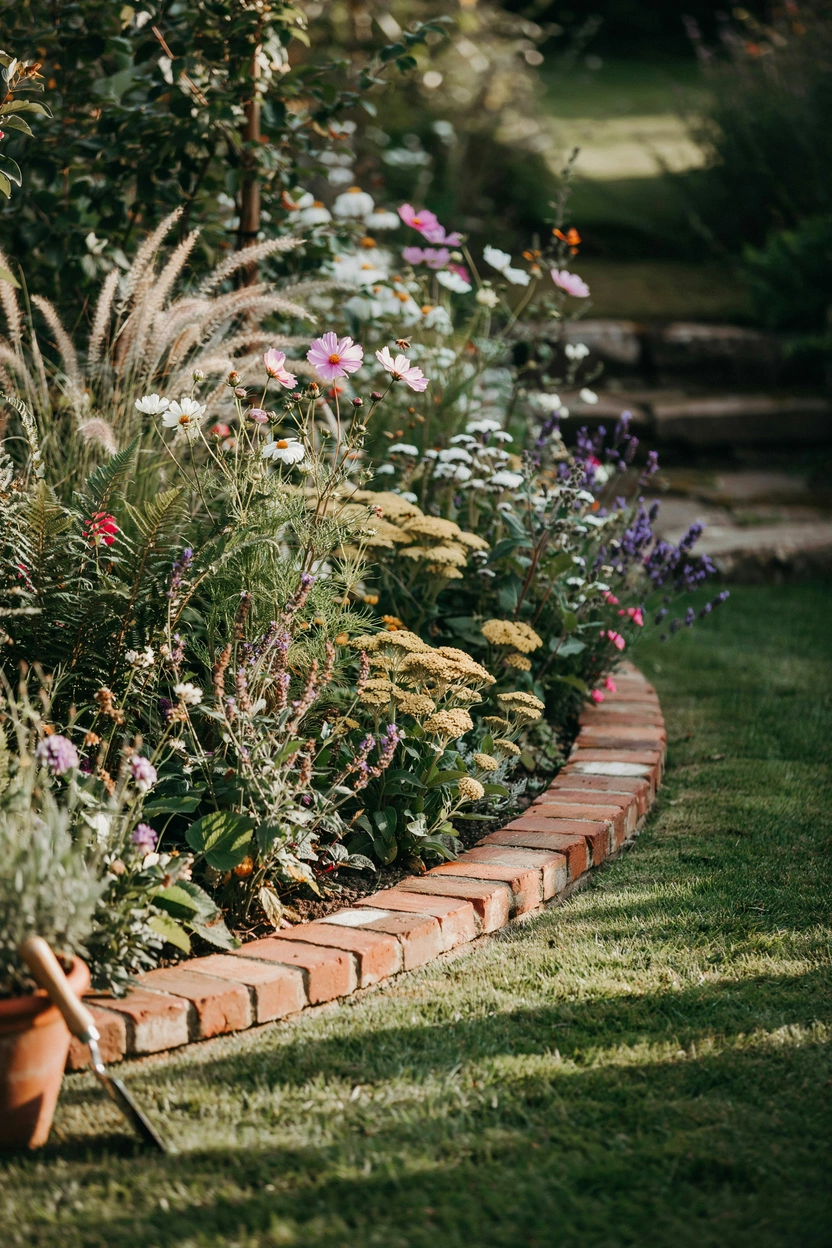
1: The Soldier Course — Upright Bricks Standing in a Clean, Crisp Line
If you want the cleanest, most defined garden border possible, this is it. Soldier course brick edging means standing bricks upright, end-up, in a single row along the garden bed. The result is a sharp, formal line that works brilliantly along driveways, front lawn edges, and any bed where you want a really precise separation between grass and garden. It’s the edging style you see in well-maintained public parks and formal gardens — and it translates just as beautifully into a home yard.
The practical side is just as good as the look. Standing bricks act as a physical barrier that actually stops lawn grass from creeping into your beds — which flat-laid bricks don’t always do as effectively. Set them in a shallow trench with a sand bed underneath, and they stay locked in place for years. Red or terracotta bricks look stunning here, but pale buff bricks give a more contemporary, refined finish.
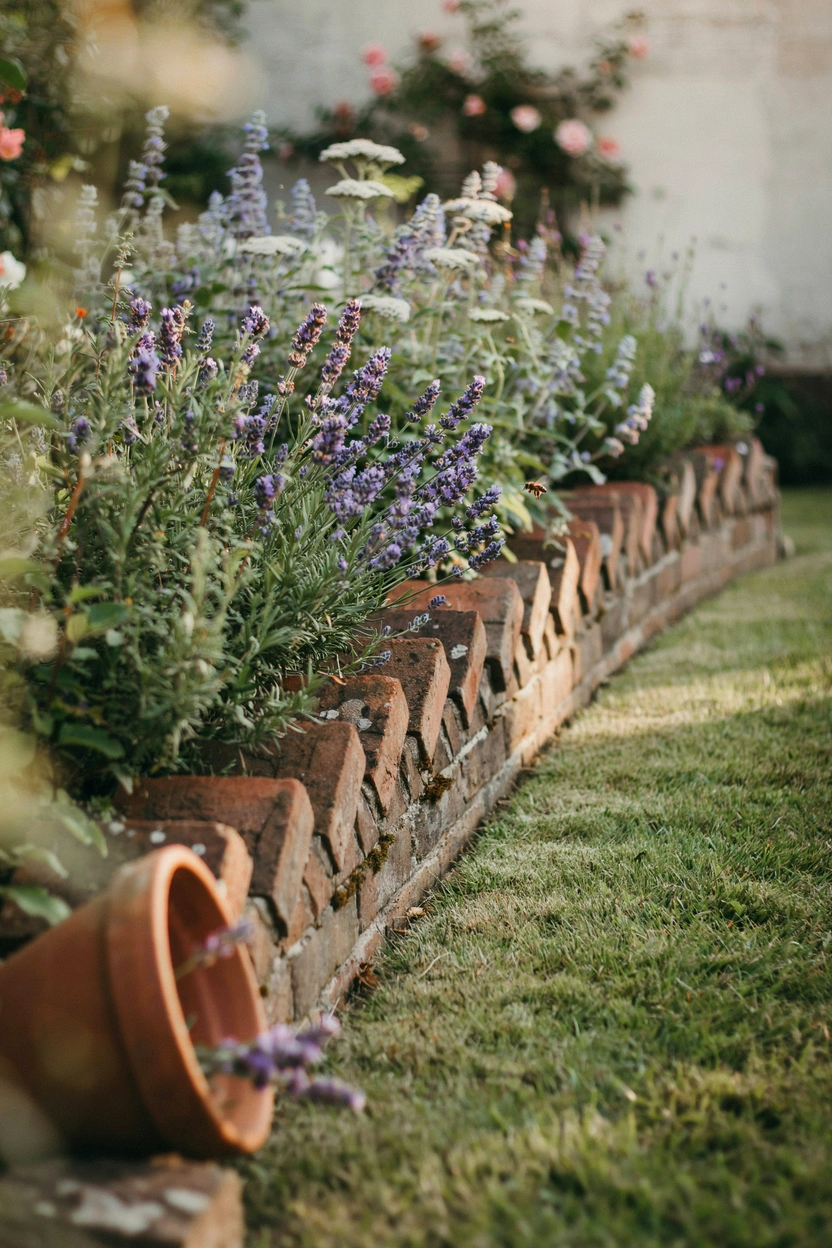
2: Diagonal “Shark Tooth” Brick Edging for a Border With Personality
This one always gets attention. Diagonal brick edging — sometimes called shark tooth or sawtooth edging — involves setting bricks at a 45-degree angle so the top corners point upward in a zigzag pattern. It sounds complicated, but it’s actually one of the easier styles to lay. The visual effect is charming and slightly rustic, with that handmade quality that looks perfect in cottage gardens, country-style yards, or any bed with abundant, relaxed planting.
What I love about this style is how well it handles curves. Because each brick sits independently at an angle, you can ease them around gentle bends without any cutting or special pieces. Pair it with lavender, salvia, or any soft, billowy planting spilling slightly over the edge, and you’ve got something straight off a Pinterest board. Use older, weathered bricks here if you can — the imperfections make it look even better.
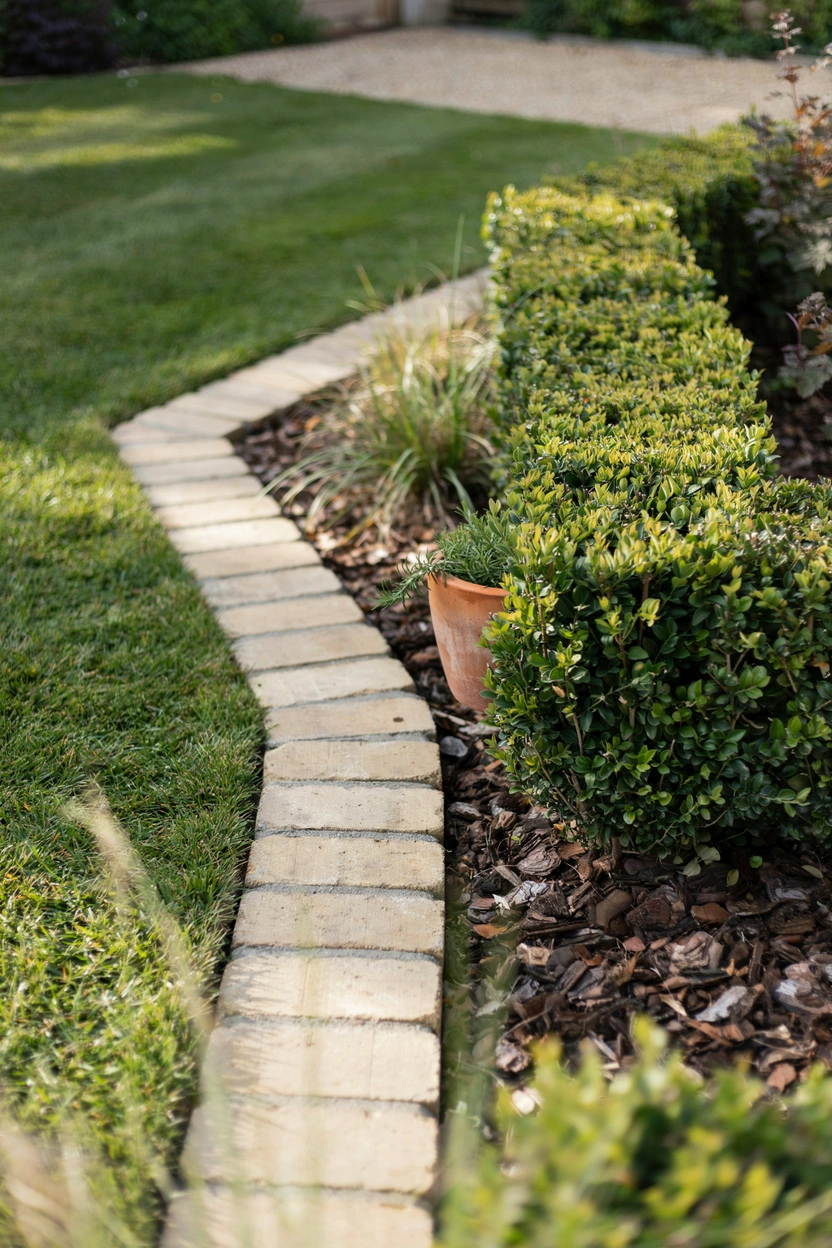
3: Flat-Laid Single-Row Brick Edging — Simple, Subtle, and Always Neat
Not every garden needs a bold statement border. Sometimes the best edging is the one you almost don’t notice — it just makes the whole garden look tidy without drawing attention to itself. Flat-laid brick edging, where bricks lie horizontally flush with the lawn surface, does exactly that. It’s clean, minimal, and works particularly well in modern or Japandi-inspired garden designs where you want structure without ornamentation.
This style is also the easiest to DIY. Dig a shallow channel, lay your sand bed, place the bricks level with the surrounding turf, and you’re done. A lawnmower can run straight over the top, which makes long-term maintenance incredibly simple. Use smooth, consistent bricks in a pale buff or grey tone for the cleanest result — or go with classic red if the rest of your garden has warm tones.
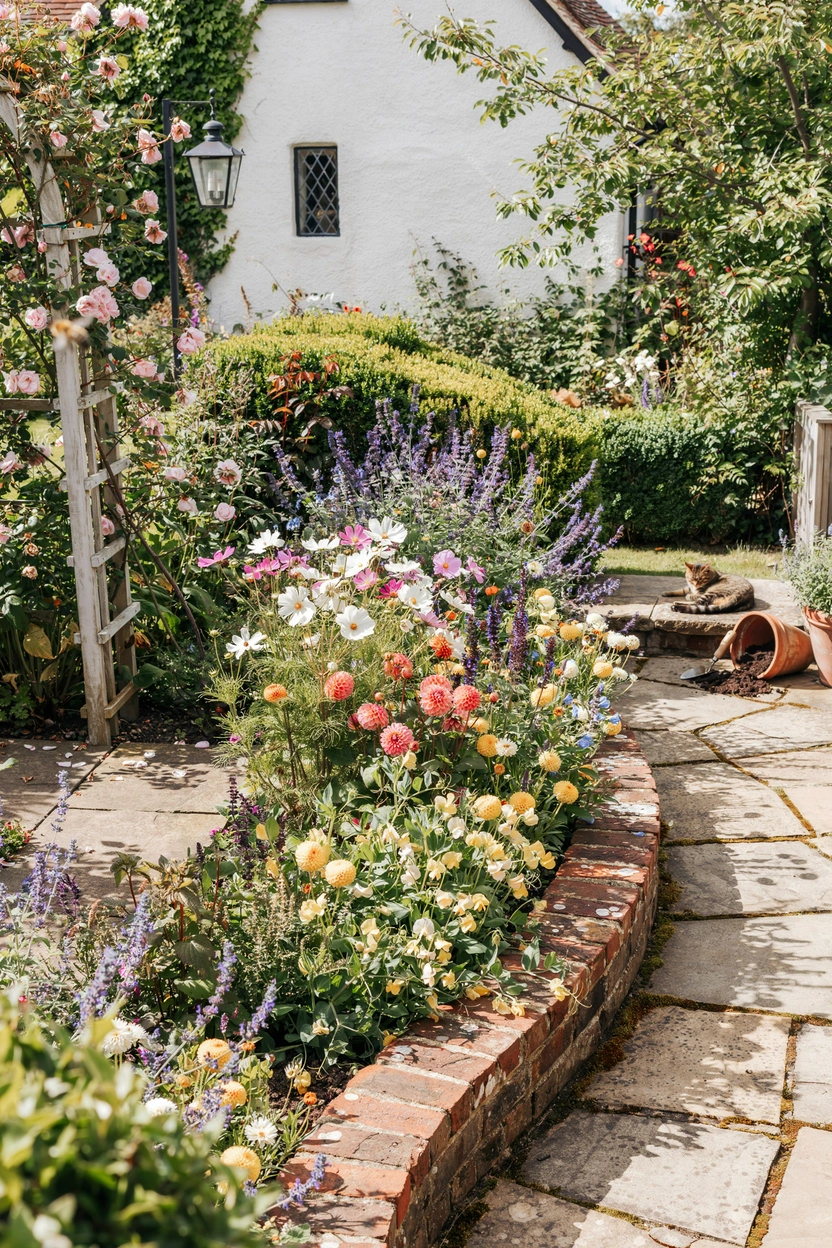
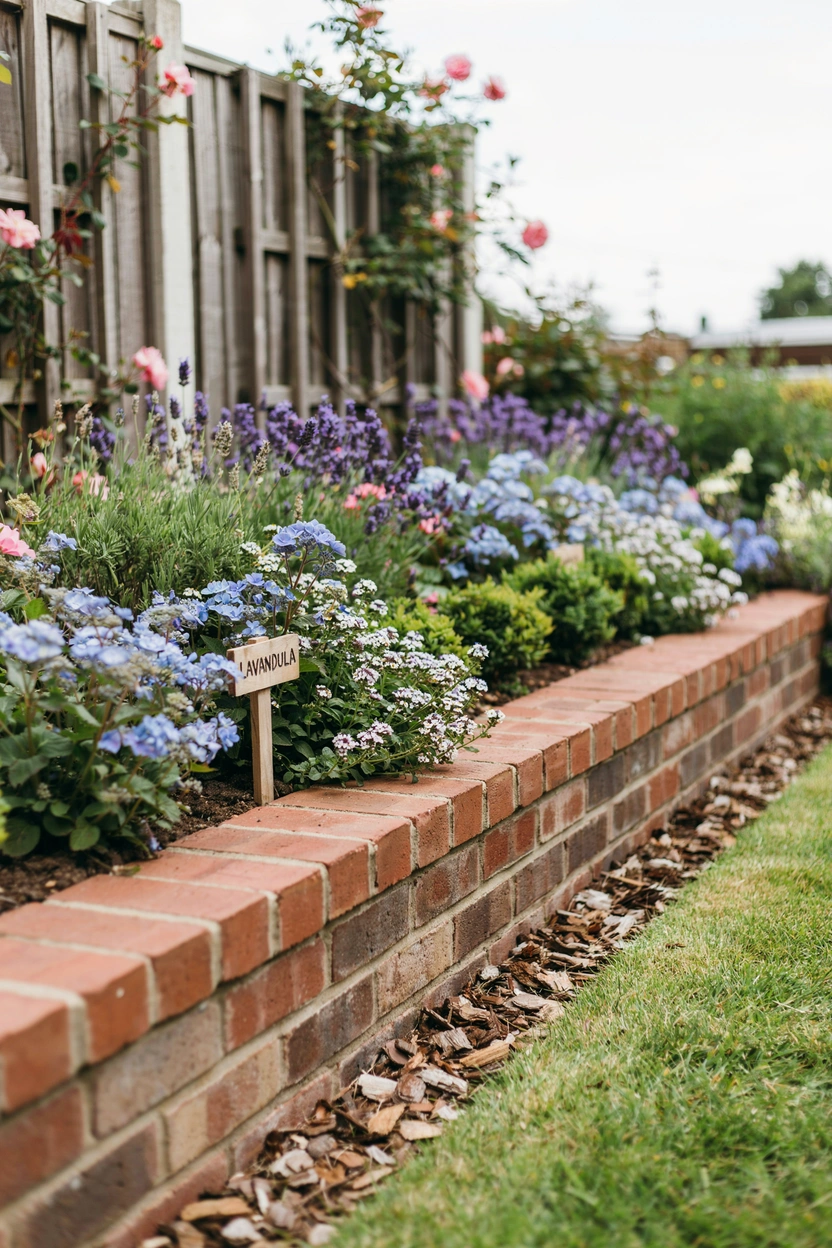
4: Double-Row Brick Edging for a More Substantial, Raised Border Look
Sometimes one row just isn’t enough — especially when you’re edging a larger bed, a raised planting area, or a spot where you want the border to really stand out architecturally. Double-row brick edging uses two parallel rows of flat-laid bricks, creating a wider border that looks substantial and well-considered. Think of it as the difference between a thin picture frame and a thick one — both work, but the thicker version makes more of a statement.
This style is perfect for separating lawn from a gravel mulch area, a bark chip path, or a wide mixed border. The gap between the two rows can be filled with matching gravel, soil, or even moss for a softened effect. It also works well as a clean transition between different garden zones — say, from a lawn area to a patio or seating space.
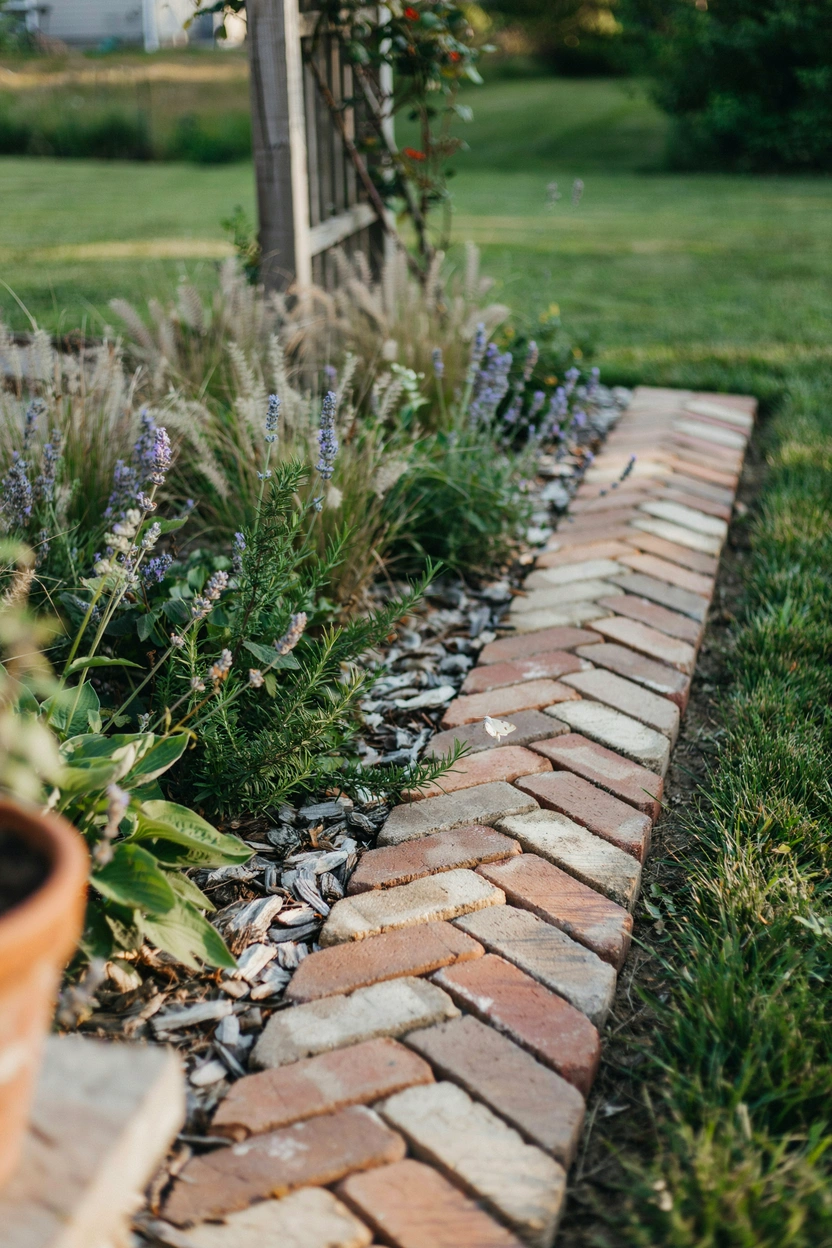
5: Herringbone Pattern Brick Edging That Doubles as a Design Feature
Here’s one that most people don’t think about for edging — and that’s exactly why it looks so impressive when you do it. Laying a short strip of bricks in a herringbone pattern as the border creates something that functions as edging but reads as intentional decorative design. It’s a fantastic choice for wider borders, patio transitions, or anywhere you want the edging itself to be part of the garden’s aesthetic story.
The herringbone pattern — bricks laid at alternating 45-degree angles in a zigzag — doesn’t require any special bricks or cuts for a straight run. You can dry-lay it in a sand bed just like standard edging. Use two slightly different brick tones for even more visual interest. It photographs beautifully, it’s genuinely unique in most neighborhoods, and it adds a craftsmanship quality that makes the whole yard look expensive.
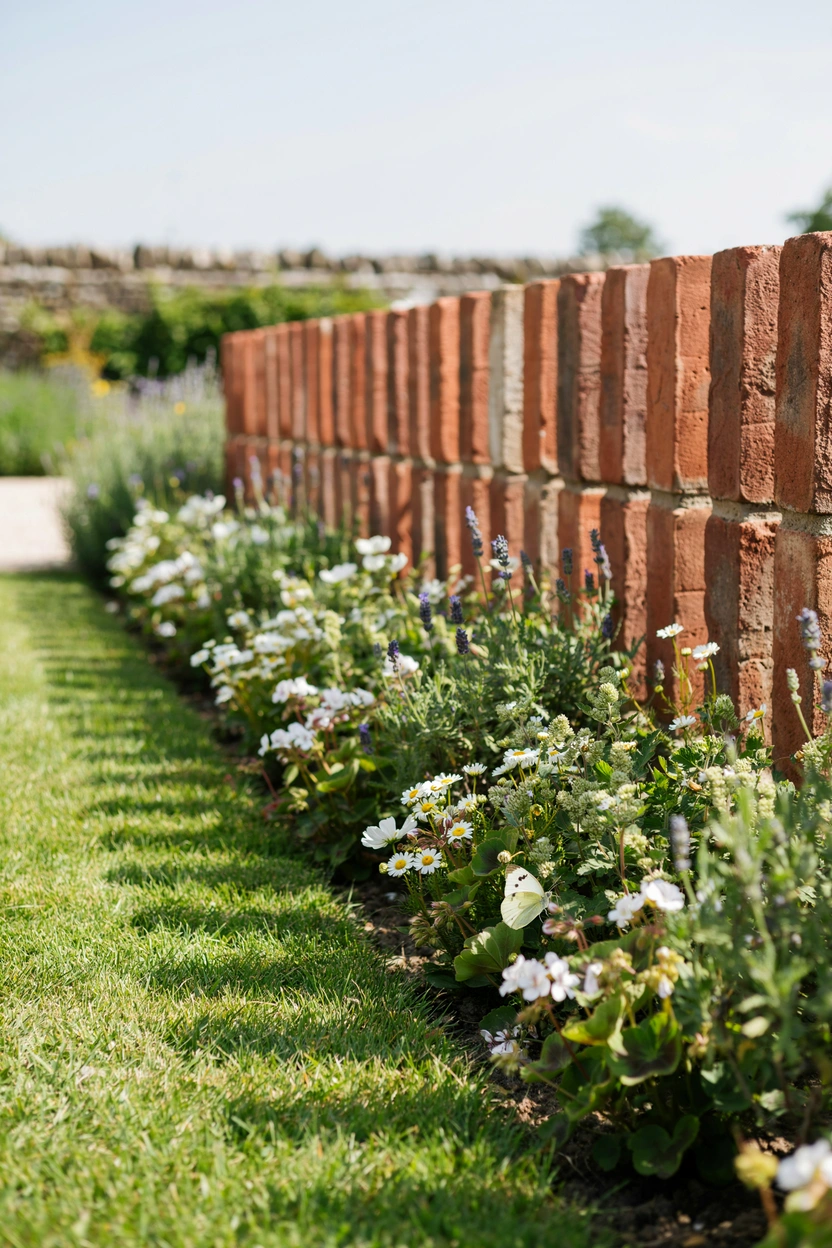
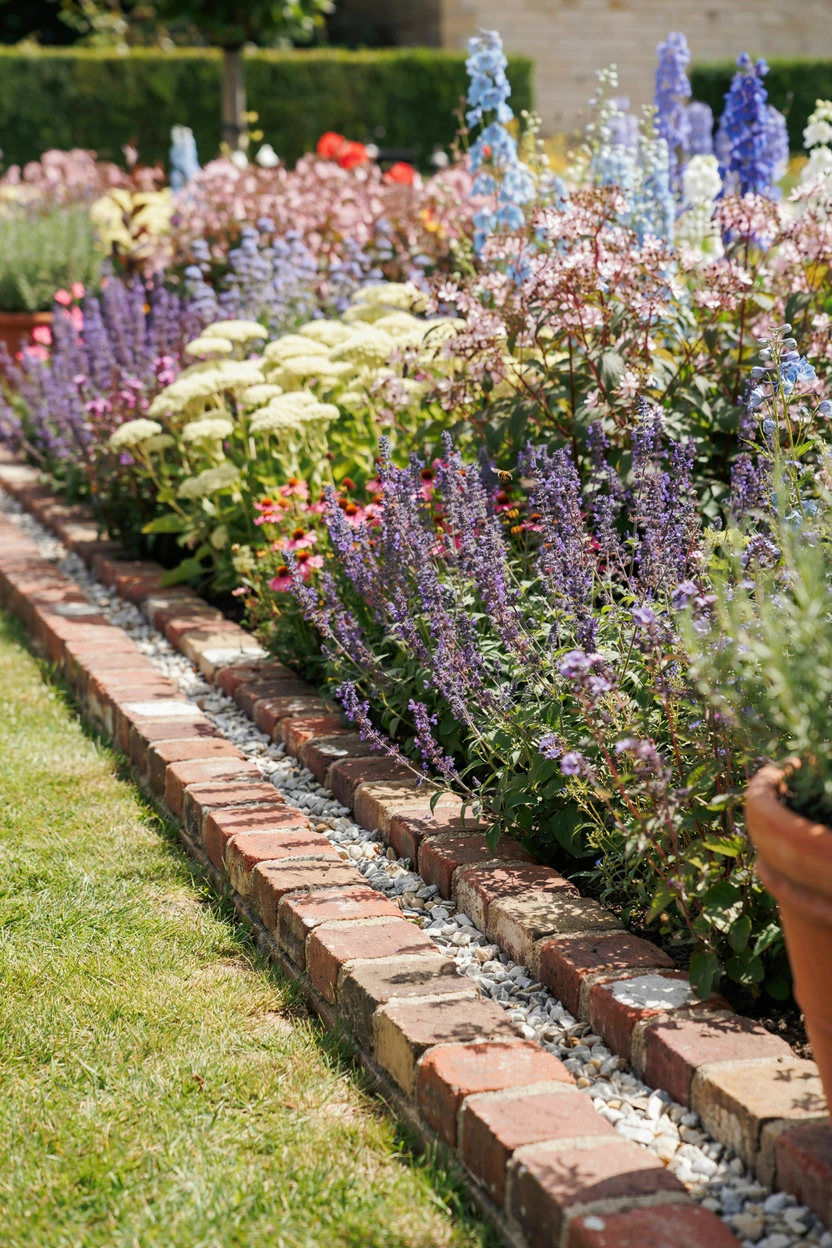
6: Reclaimed Brick Garden Edging — Rustic, Sustainable, and Almost Free
Old bricks have a quality that new ones simply don’t — that worn, slightly uneven, patchy surface that looks like it has a history. Reclaimed brick garden edging leans into this completely, using salvaged bricks from demolition sites, old walls, or reclamation yards to create a border that feels genuinely rooted in the landscape. The color variation between old bricks — some redder, some more orange, some faded buff — creates a naturally varied pattern that looks far more interesting than a perfectly uniform new-brick border.
The sustainability angle is real too. You’re diverting material from landfill and spending very little (sometimes nothing, if you ask around locally or check Facebook Marketplace). The imperfect sizing of old bricks actually works in your favor here — slight height variations give the border a handmade, organic quality that suits naturalistic planting styles perfectly. Set them in the same sand-bed method as new bricks, and they’ll last just as long.
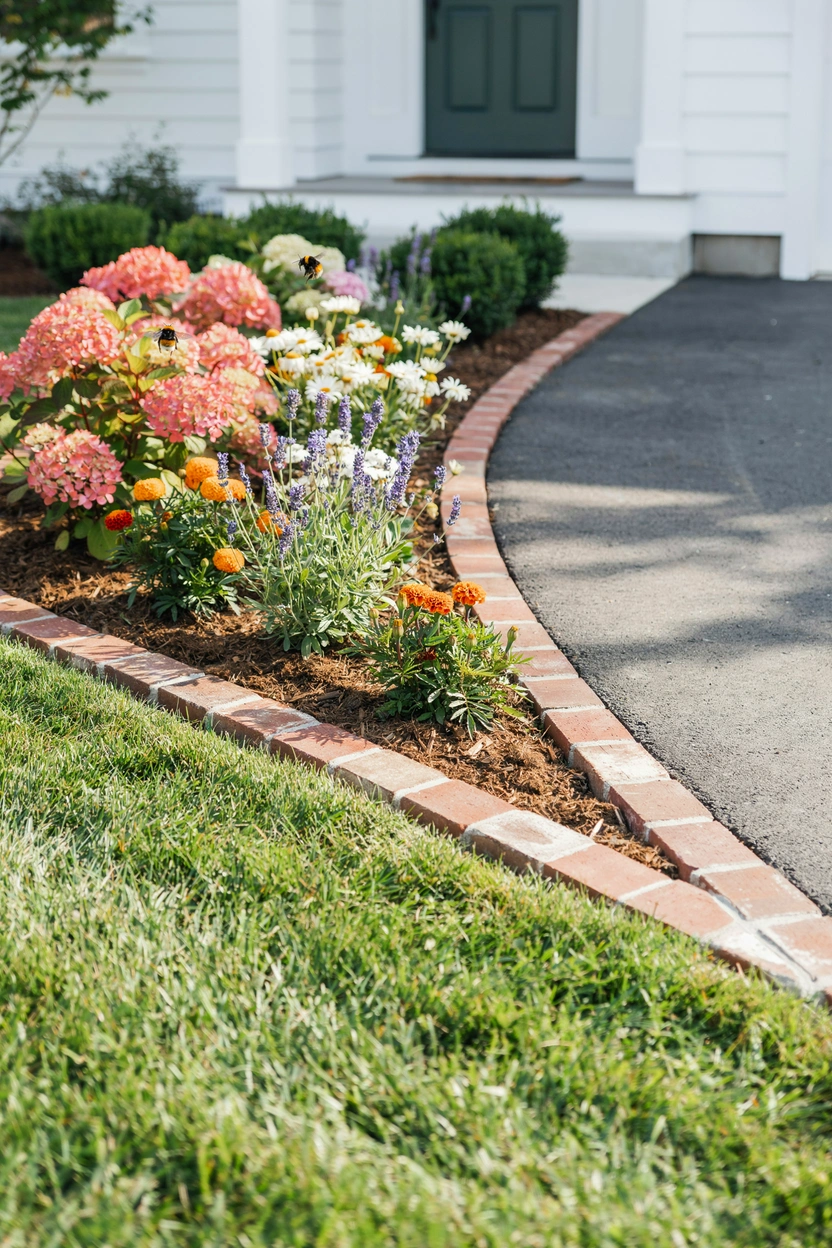
7: Curved Brick Edging That Softens Straight Garden Lines
Straight edges have their place, but curved garden borders feel more alive, more natural, and honestly more beautiful to most people. The good news is you don’t need special curved bricks or any cutting to achieve a smooth, flowing brick border. Standard rectangular bricks, set at slight angles to each other in a soldier or diagonal style, follow a curve naturally if you work slowly and keep checking your line as you go.
Use a garden hose laid on the lawn to mark out your desired curve before you start digging — it’s the oldest trick in the book, and it works brilliantly. The gentle arc of a curved brick border works especially well around island beds, tree circles, and lawns with organic flowing shapes. Add a low-growing ground cover plant right at the edge to soften the transition between the bricks and the planting, and the whole thing looks like it grew there naturally.
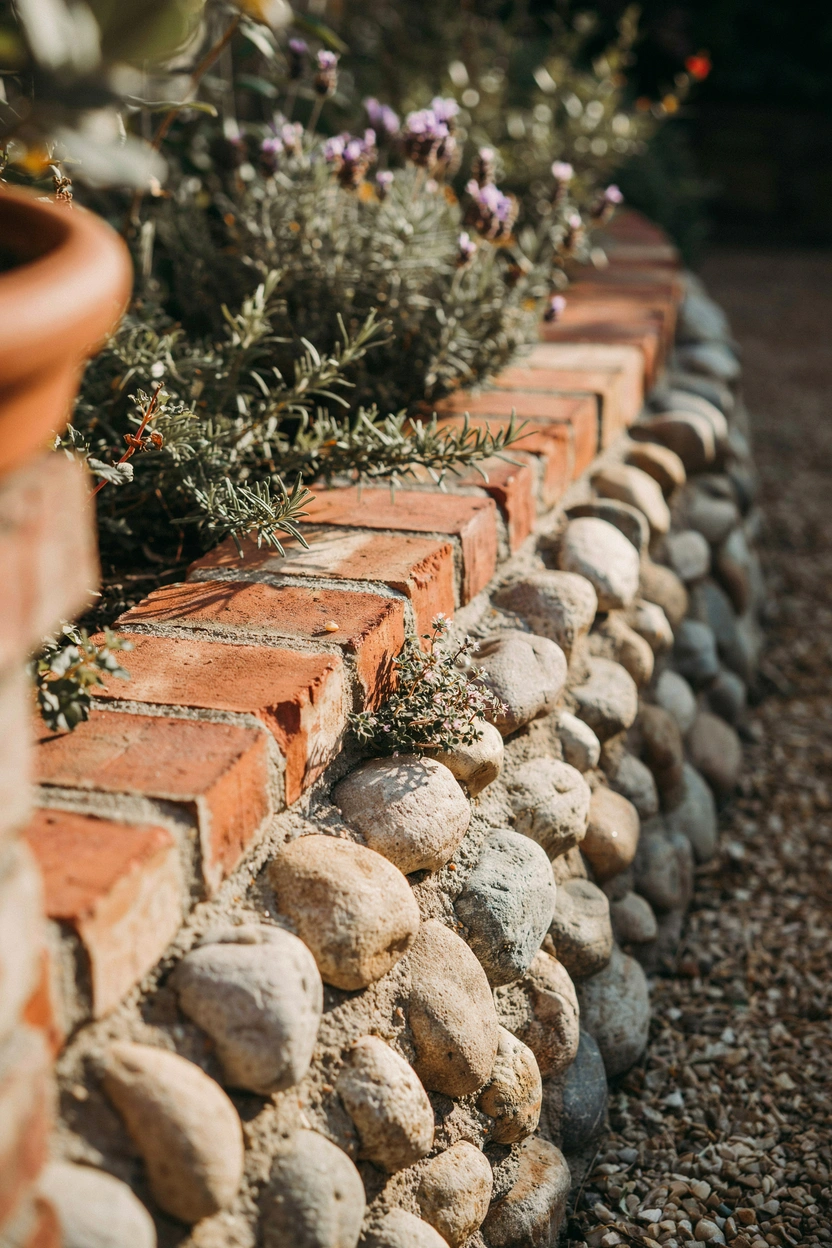
8: Alternating Brick and Stone Edging for a Natural, Textured Border
If pure brick feels a bit uniform for your garden’s style, mixing bricks with natural stones or cobbles creates a border that looks genuinely handcrafted. The contrast between the sharp geometric lines of the brick and the rounded organic shapes of the stones is visually interesting in a way that neither material achieves alone. Use one brick, one stone, one brick, one stone in an alternating pattern — or cluster two or three bricks between cobblestones for a less rigid rhythm.
This style works beautifully in naturalistic, wildlife-friendly, or Mediterranean-inspired gardens. The varied texture catches light differently throughout the day, and the mix of materials means any imperfections in sizing or alignment read as character rather than mistakes. Source rounded river cobbles or flint stones from a local builders’ merchant for the best look alongside standard terracotta or buff bricks.
9: Color-Contrasting Brick Edging Using Two Different Brick Tones
This is one of the easiest ways to make a standard brick border look considered and designed — just use two alternating brick colors. Red brick and pale buff brick laid in alternating pairs create a subtle stripe pattern along the edge of the bed. It’s simple, it’s repeatable, and it looks genuinely intentional. You can also use new and reclaimed bricks together if you have a mix — the tonal variation creates the same contrast effect.
The visual impact is strongest when the two tones are clearly different but still warm-toned — avoid mixing red brick with anything cool grey or blue-toned, or it can look jarring. This style photographs brilliantly on Pinterest because the pattern is visible even in a wider shot. It works in formal and informal gardens alike, and it’s particularly effective along long, straight borders where a single-tone brick run might start to feel monotonous.

10: Angled Corner Brick Edging for Clean Raised Garden Bed Corners
If you’re edging a rectangular or square garden bed, the corners are where most DIY attempts fall apart. Bricks just don’t naturally want to turn 90 degrees cleanly. The solution is to miter your corner bricks — cutting each one at 45 degrees so they meet cleanly at the point. It’s one cut per corner, and it makes an enormous difference to the finished look. Clean, tight corners make the whole border look professional rather than amateurish.
If you don’t have a brick saw, some hire shops carry them for a daily rate — totally worth it for the result. Alternatively, you can overlap the corner bricks (one row over the other) and use a slightly deeper brick in the corner to compensate for the offset. This overlap method is actually traditional in brick laying and looks very intentional when done consistently on all four corners. Either way, getting your corners right is what separates a neat DIY border from a great one.
11: Front Yard Brick Edging That Adds Instant Curb Appeal
The front yard is the first thing anyone sees — neighbors, visitors, anyone passing by. And clean brick edging along the front lawn edge, driveway border, or path sides transforms a yard from ordinary to polished almost overnight. It creates a visual frame for everything growing in the beds and gives the whole property a maintained, cared-for quality that increases curb appeal significantly.
For front yards, I’d lean toward a formal style — soldier course or flat-laid double row work best here because they read as clean and intentional from a distance. Pale buff or grey bricks look particularly sharp against green lawn in a modern setting. Classic red brick works beautifully with period homes, brick paths, or traditional cottage-style planting. Either way, edging the front garden is one of the highest-return weekends you’ll spend on your yard.
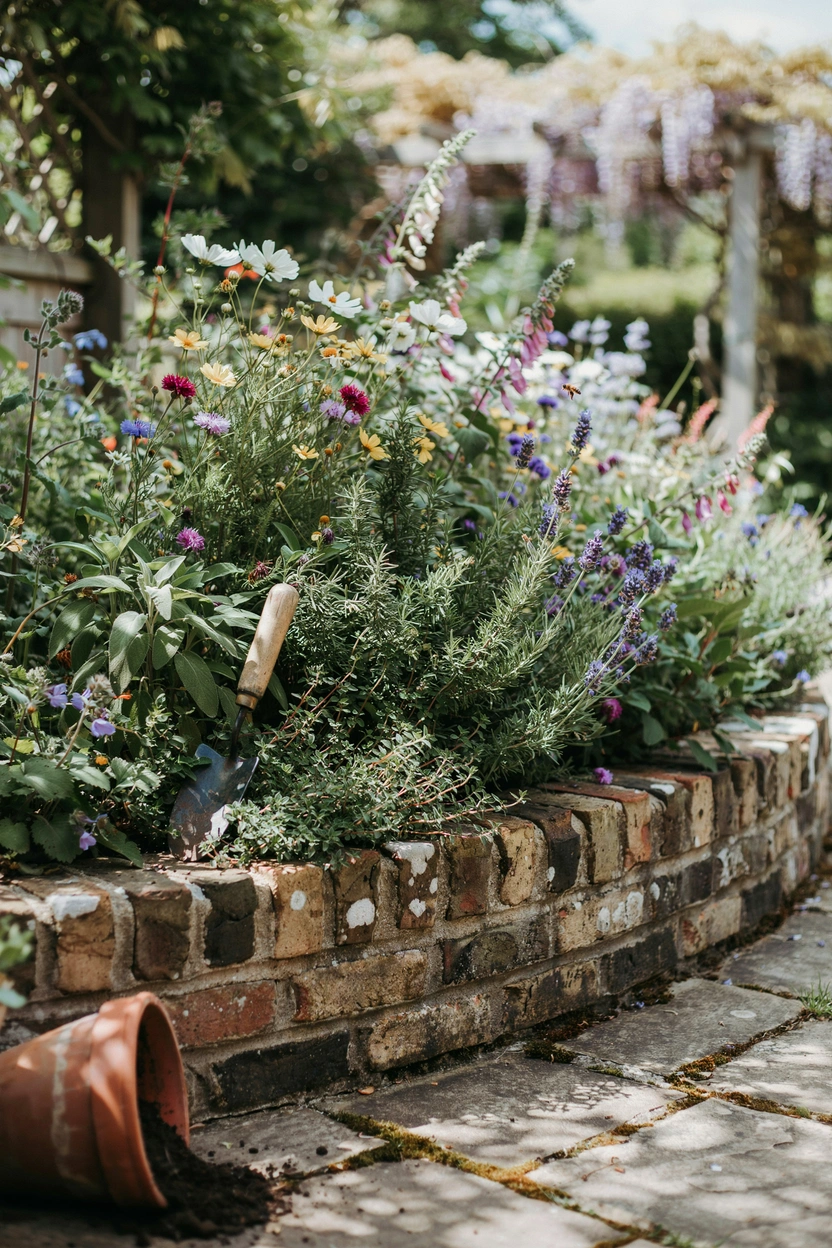
12: Backyard Flower Bed Brick Edging That Keeps Mulch Where It Belongs
Here’s the thing about mulch — it migrates. Bark chips, wood mulch, gravel — they all gradually creep onto the lawn if nothing is stopping them. Brick edging solves this completely. A neat brick border around your backyard flower beds acts as a physical retaining wall for whatever you use as mulch, keeping it inside the bed where it belongs and stopping lawn grass from making its way in from the other direction.
Raised brick edging works particularly well here — bricks set slightly higher than the lawn level so they create a visible lip that holds the mulch back. Even 5–8cm of visible brick above ground level makes a real difference. Go for flat-laid double row for the cleanest result in a large backyard bed, or soldier course if the bed is more defined and formal. The long-term maintenance savings alone make this one of the most practical ideas on this list.

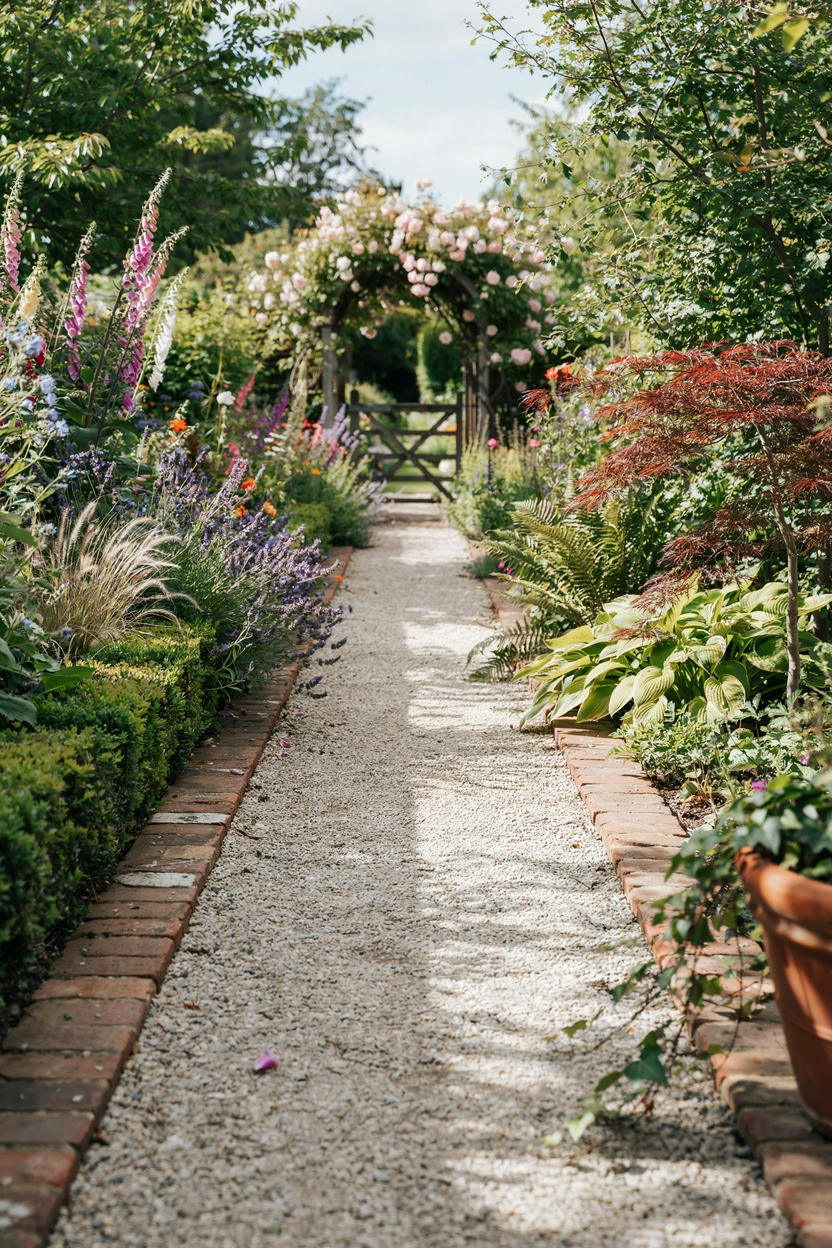
13: Brick Path Edging Along Garden Walkways and Stepping Stone Paths
A garden path without edging always looks slightly unfinished — like the path just stops and the lawn begins without any conversation between them. Brick edging along the sides of a gravel path, flagstone walkway, or bark chip path creates that clean, deliberate transition that makes the whole garden feel designed. It also practically stops the path material from spreading onto the lawn, which happens with every gravel path that doesn’t have a defined edge.
The visual cohesion you get when path edging matches the flower bed edging elsewhere in the garden is really satisfying — everything starts to feel like one connected, considered design rather than a collection of separate elements. Use the same brick throughout to tie it all together. Soldier course along a straight path, or gentle diagonals along a curved woodland-style path — both look brilliant, and both take a single afternoon to lay.
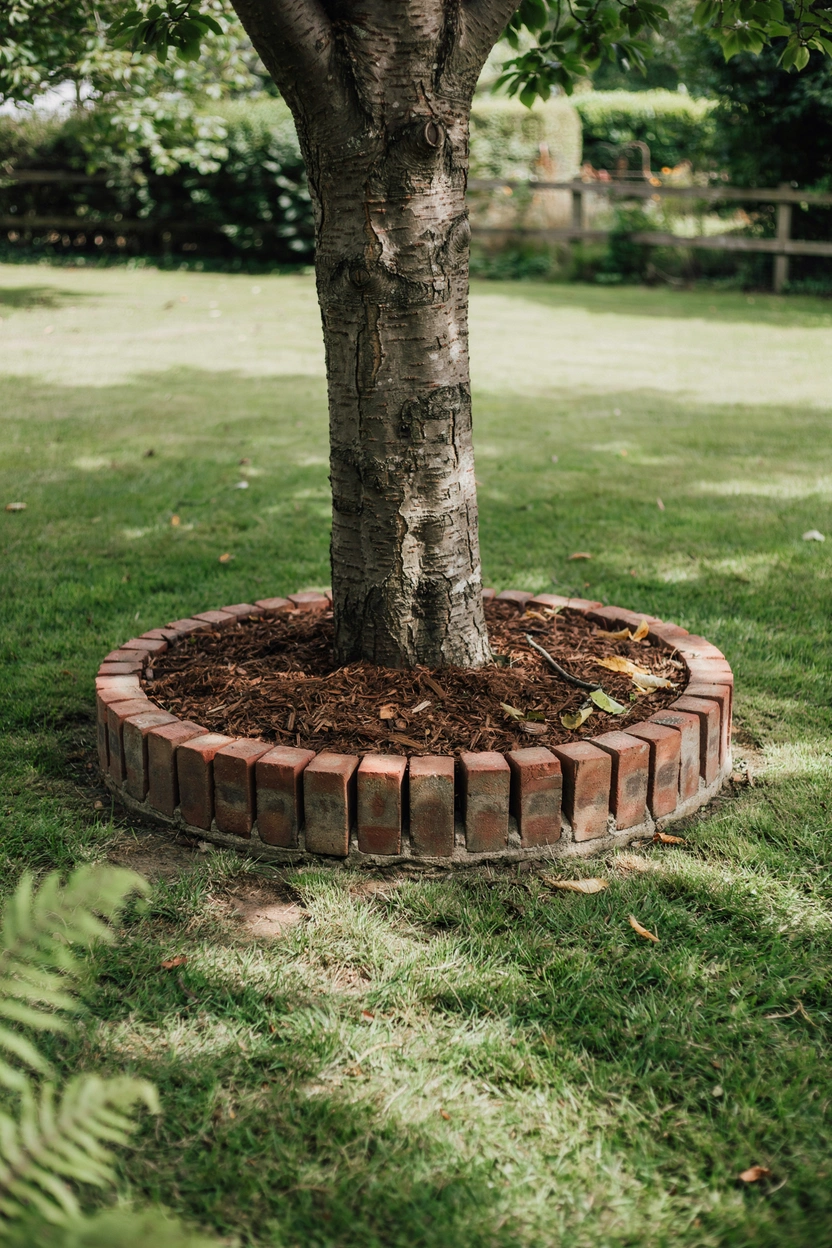
14: Brick Edging Around Trees and Circular Garden Beds
A circular brick border around a tree base or lawn island bed is one of those details that looks incredibly considered but is actually not that difficult to achieve. The trick is to mark the circle first — push a stake into the center of the tree, tie a string to it at your desired radius, and walk the string around the trunk, dragging a mark in the soil. That gives you a consistent, accurate circle to work on. Then it’s just a case of setting bricks in a gentle curve along that line.
Soldier course bricks work particularly well for circular edging because their upright, narrow profile negotiates the curve more easily than flat-laid bricks. Space them with a very slight outward lean to accommodate the circular geometry — each brick fans out fractionally from the center. Fill the inside of the circle with dark bark mulch, and the whole thing looks like a professional landscaper did it. This is one of those ideas that genuinely photographs beautifully every season.
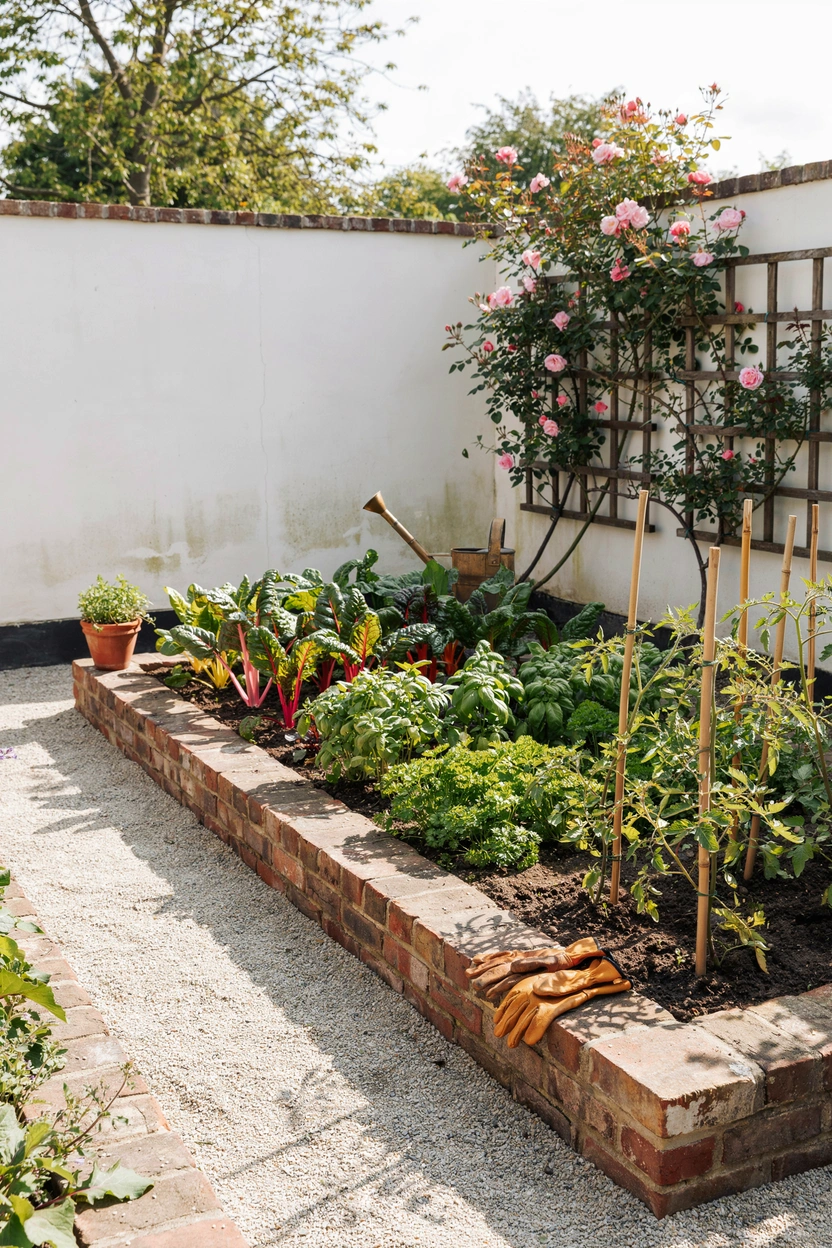
15: Brick Edging for Vegetable and Kitchen Garden Beds
Raised veg beds and kitchen gardens benefit from brick edging more than almost any other part of the garden — and not just aesthetically. A clean brick border keeps soil and mulch contained within the bed, prevents grass from invading the growing area, creates a firm edge to kneel against during planting and harvesting, and improves drainage by keeping the bed’s soil profile distinct from the surrounding lawn. It’s practical on every level.
For kitchen gardens, I particularly like the look of neat double-row flat brick edging with slightly raised height — it gives the bed a defined, purposeful look that matches the productive intent of the space. Paint the bricks white or leave them natural depending on your garden’s tone. A neat vegetable garden with clean brick borders has that classic walled-kitchen-garden aesthetic that never goes out of style — and it makes the harvests feel even more satisfying.
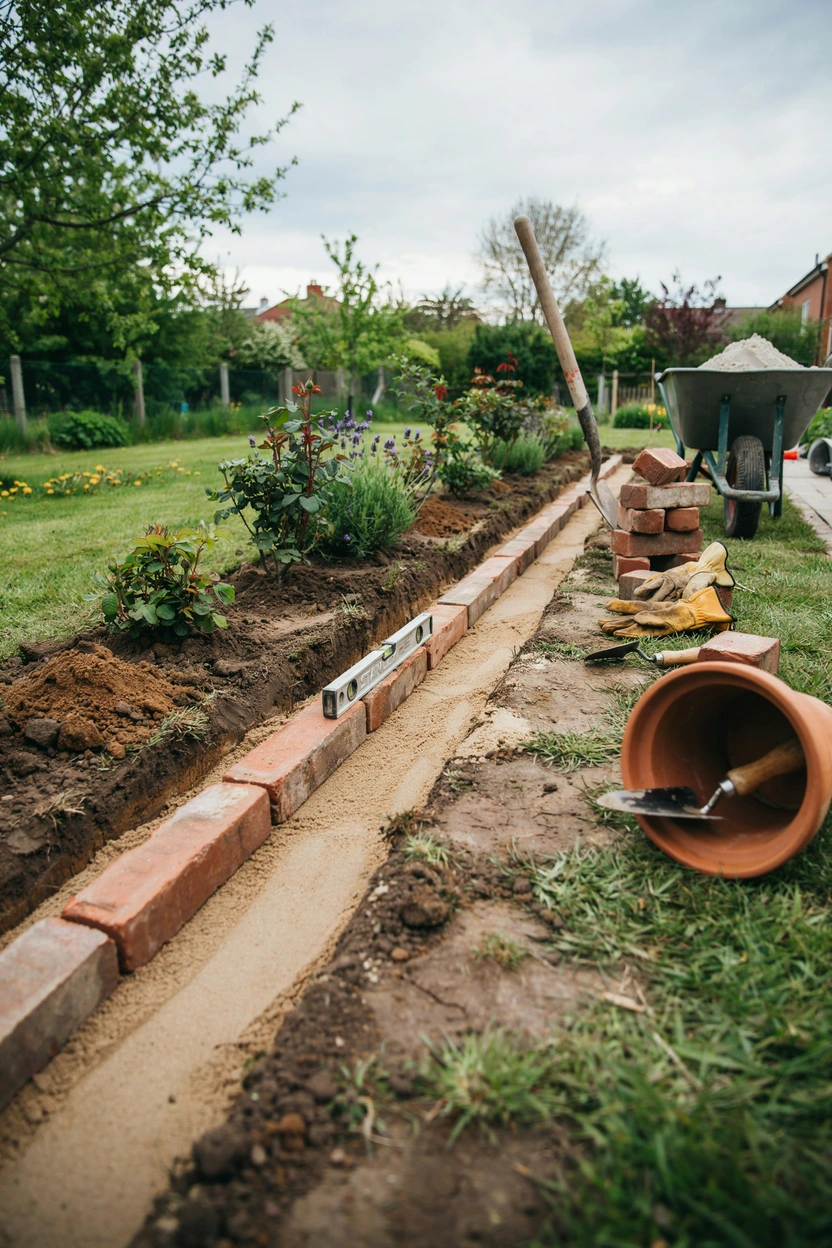
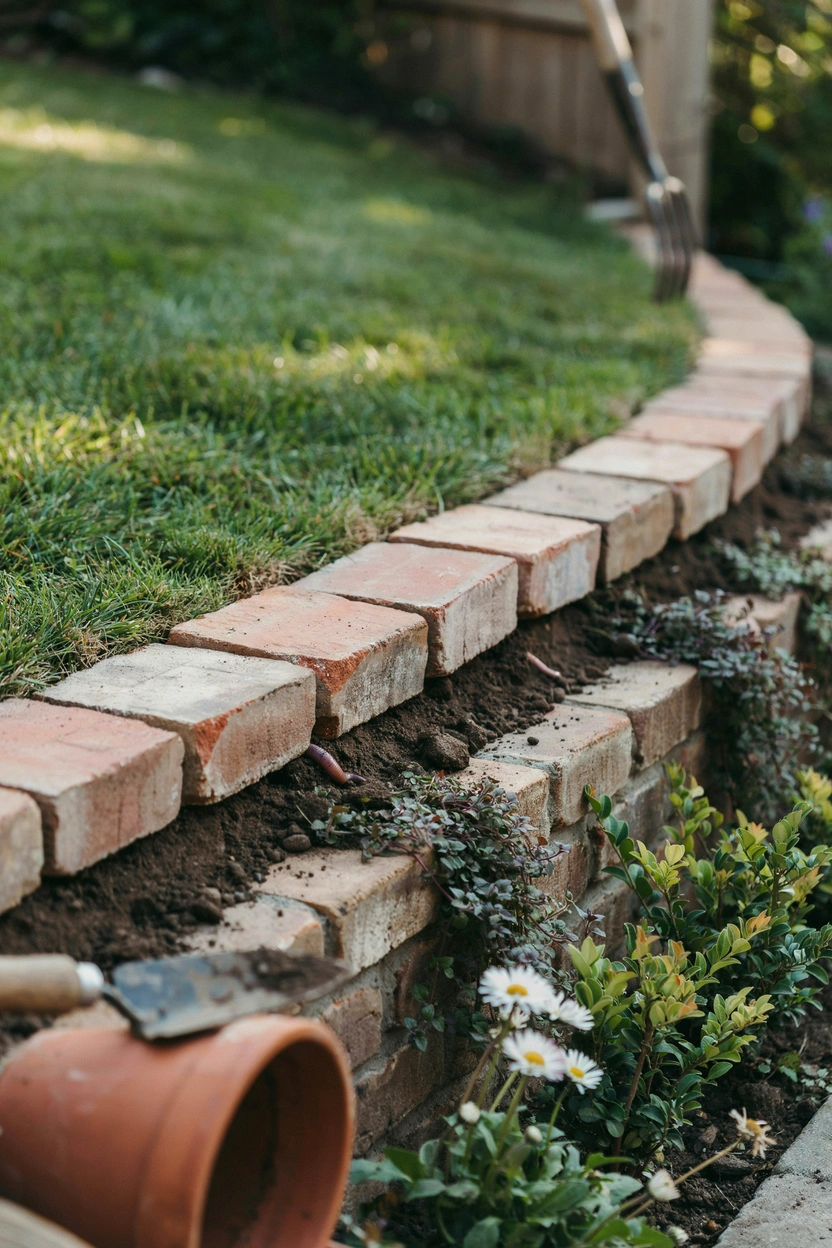
16: Mortar-Free Brick Edging You Can Lay in an Afternoon
This is the one that makes most people go “wait, that’s it?” You genuinely don’t need mortar, cement, or any specialist tools to lay a solid, long-lasting brick garden border. All you need is a spade, a spirit level, a rubber mallet, and a bag of sharp sand. Dig your trench to about 15–20cm deep, lay a 5cm bed of compacted sand, set your bricks level, and backfill the soil around the outside. Done. Dry-laid brick edging is stable, frost-resistant, and actually easier to adjust or repair than mortared edging if you ever want to reshape a bed.
The whole process for a standard 10-meter garden bed border takes about 3–4 hours, including trench digging. Start at one end, keep checking your level as you go, and tap each brick gently into the sand with the mallet. The most important thing is the sand bed depth — consistent depth means consistent height across the whole run. It’s one of the most satisfying DIY garden projects you can complete in a single day, and the result looks professional immediately.
17: Cheap Brick Garden Edging Ideas Using Leftover or Discount Bricks
You’d be surprised how easy it is to get bricks for almost nothing. Facebook Marketplace regularly has listings for free or very cheap reclaimed bricks from homeowners who’ve knocked down old walls, paths, or outbuildings. Local demolition sites sometimes offer bricks for collection. Reclamation and salvage yards sell them for a fraction of new brick prices — and the older they are, the better they often look in a garden context.
Even if you’re buying new, a single pallet of standard engineering bricks from a builders’ merchant is very affordable for a full garden edge. Compare this to the cost of metal or plastic edging, which fades, cracks, and needs replacing — brick edging genuinely costs less over ten years while looking significantly better the entire time. For a tight budget, mixing free reclaimed bricks with a small quantity of matching new bricks gives a consistent-enough look while keeping the cost minimal.
18: Half-Buried Brick Edging for Extra Stability on Slopes and Inclines
Standard brick edging on flat ground is straightforward — but on a slope, the rules change slightly. If your garden has any kind of gradient, bricks laid at the standard depth will gradually work loose as rain washes soil from beneath them and gravity pulls slightly on the structure. The solution is to bury your bricks significantly deeper on slopes — around 50–60% of the brick below ground, rather than the standard 30–40%. The extra depth gives each brick much more resistance to movement.
On steeper slopes, you might want to add a small concrete foundation at the downhill edge of the trench — just a thin line of mixed concrete beneath the bricks rather than a full mortar bed. This extra anchor at the base prevents the whole run from gradually sliding downhill over time. The top surface can still look identical to standard flat-ground edging. It’s one of those structural considerations that most beginner garden projects overlook — and that makes the difference between edging that lasts two years and edging that lasts twenty.
Conclusion
I’ll say it simply: brick garden edging gives you more visual return per hour of effort than almost any other garden project. It doesn’t require a big budget, special skills, or professional help. A bag of sand, a spade, and a few dozen bricks — that’s all it takes to make a garden look like it was designed rather than just planted.
Start small if you’re not sure. Pick one bed, one border, one section of path. Try flat-laid bricks if it’s your first time. See how it looks. I’d bet that within a week you’ll be planning which bed to edge next.
The ideas in this list cover every style, every budget, and every part of the garden. Whether you’re going for a formal front yard border, a rustic reclaimed cottage edge, or a clean modern gravel-and-brick combination — there’s a version here that works for your space.
Save your favorites, pick your first project, and go turn that unfinished garden into something you’re actually proud of.